Feature
Download
HIOS clover screw with three large curved wings would offer perfect fit with the driver bit, very precise tightening and prevents Cam out phenomenon.
The screw recess is designed to guide the driver bit to the inner circle at the center of itself. And, it is suitable for automation.
Shape comparison
Hios Clover®PAT.

Shape of driver bit trip:Straight
Thanks to the straight design it prevents cam out phenomenon.
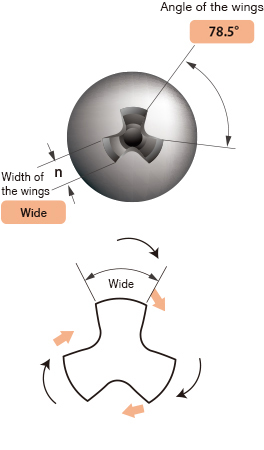
The Clover drive translates the applied torque efficiently into screw rotation thanks to the inward force generated by the wide curved desigh of the wings.
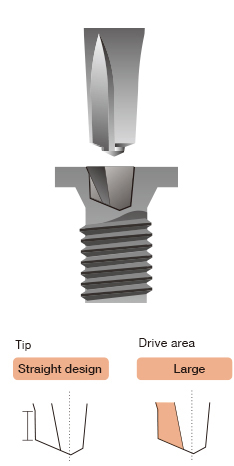
- Because the drive area is large, less force is applied per unit area, so the recess hardly gets damaged.
- With no upward force being generated when rotated, thanks to the drive profile, the screw requires a less thrust to be tightened as the driver bit does not pop out.
- Because drive force per unit area is smaller, wear of the driver bit would be reduced and life.
- Offers highly reliable fastening thanks to the perfect fit between the driver bit and.
Other companies 'Y' recess screw

Shape of driver bit trip:Tapered
Due to the tapered design the driver bit easily pops out.
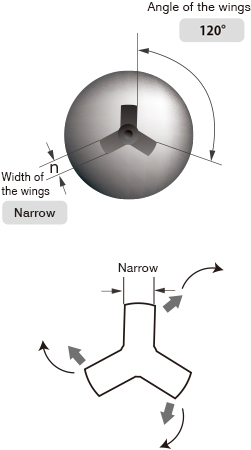
The narrow wings bring about poor torque transmission and causes cam out phenomenon due to the upward force generated by the tapered desigh.
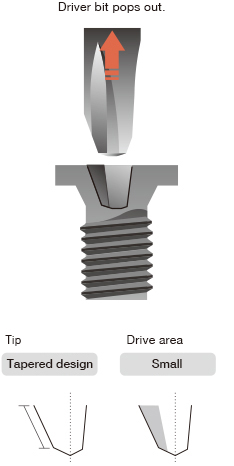
- Because the drive area is small, more force is applied per unit area, so the recess easily gets damaged.
- With upward force being generate when rotated, it requires a more thrust force to prevent the driver bit from popping out and causing cam out.
- The driver bit easily gets worn due to the large drive force per unit area.
- The poor fit between the driver bit and screw recess makes tightening work unstable, and causes screw tightening errors more often.
HIOS Clover screw
Specification Table
Specification Table
Precision No.0
Thin flat (height: 0.5)
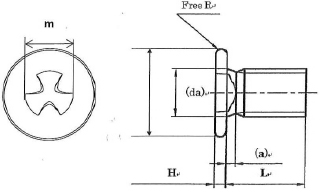
| Nominal diameter(M) | M1.4 | M1.6 | M1.7 | M2.0 | ||||||||||||||||||
| Clover ( m dimension) | (1.00) | ♯0 | ♯0 | ♯0 | ||||||||||||||||||
| Head diameter | Φ (dk) | 3.0 | 3.5 | 3.5 | 4.0 | 3.5 | 4.0 | 4.5 | 4.0 | 4.5 | 5.0 | |||||||||||
| Tolerance |
+0.05 -0.20 |
+0.05 -0.20 |
+0.05 -0.20 |
+0.05 -0.20 |
+0.05 -0.20 |
+0.05 -0.20 |
+0.05 -0.20 |
+0.05 -0.20 |
+0.05 -0.20 |
+0.05 -0.20 |
||||||||||||
| Head Thickness | (K) | 0.5 | 0.5 | 0.5 | 0.5 | 0.5 | 0.5 | 0.5 | 0.6 | 0.6 | 0.6 | |||||||||||
| Tolerance |
+0.05 -0.05 |
+0.05 -0.05 |
+0.05 -0.05 |
+0.05 -0.05 |
+0.05 -0.05 |
+0.05 -0.05 |
+0.05 -0.05 |
+0.05 -0.05 |
+0.05 -0.05 |
+0.05 -0.05 |
||||||||||||
| Q dimensions | 0.74-0.51 | 0.74-0.51 | 0.84-0.56 | 0.84-0.56 | 0.89-0.61 | 0.89-0.61 | 0.89-0.61 | 1.21-0.91 | 1.21-0.91 | 1.21-0.91 | ||||||||||||
| Under head reinforcement (φda) | (1.80) | (1.80) | (2.00) | (2.00) | (2.10) | (2.10) | (2.10) | (2.60) | (2.60) | (2.60) | ||||||||||||
Pan head
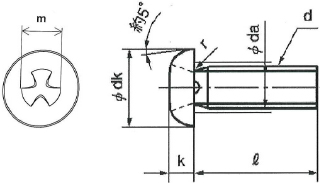
| Nominal diameter | M2 | M2.3 | M2.5 | M2.6 | M3 | M3.5 | M4 | M5 | M6 | |||||||||
| Clover ( m dimension) | (1.9) | (1.9) | (2.3) | (2.3) | (3.5) | (3.8) | (4.1) | (4.5) | (5.0) | |||||||||
| Head diameterΦ(dk) | 3.5 | 4.0 | 4.5 | 4.5 | 5.5 | 6.0 | 7.0 | 9.0 | 10.5 | |||||||||
| Head tolerance |
+0 -0.4 |
+0 -0.4 |
+0 -0.4 |
+0 -0.4 |
+0 -0.5 |
+0 -0.5 |
+0 -0.5 |
+0 -0.5 |
+0 -0.7 |
|||||||||
| Head Thickness(K) | 1.3 | 1.5 | 1.7 | 1.7 | 2.0 | 2.3 | 2.6 | 3.3 | 3.9 | |||||||||
| Height tolerance | ±0.1 | ±0.1 | ±0.1 | ±0.1 | ±0.15 | ±0.15 | ±0.15 | ±0.15 | ±0.2 | |||||||||
| Q dimensions | 1.40-1.10 | 1.40-1.10 | 1.70-1.30 | 1.70-1.30 | 1.80-1.40 | 2.1-1.70 | 2.50-2.00 | 2.73-2.14 | 2.86-2.26 | |||||||||
Truss head
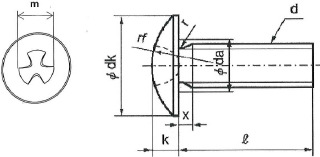
| Nominal diameter | M2 | M2.3 | M2.5 | M2.6 | M3 | M3.5 | M4 | M5 | M6 | |||||||||
| Clover ( m dimension) | (2.2) | (2.3) | (2.3) | (2.3) | (3.5) | (3.8) | (4.1) | (4.5) | (5.0) | |||||||||
| Head diameterΦ(dk) | 4.5 | 5.2 | 5.7 | 5.9 | 6.9 | 8.1 | 9.4 | 11.8 | 14.0 | |||||||||
| Head tolerance |
+0 -0.4 |
+0 -0.4 |
+0 -0.4 |
+0 -0.4 |
+0 -0.5 |
+0 -0.5 |
+0 -0.5 |
+0 -0.6 |
+0 -0.7 |
|||||||||
| Head Thickness(K) | 1.2 | 1.4 | 1.5 | 1.6 | 1.9 | 2.2 | 2.5 | 3.1 | 3.7 | |||||||||
| Height tolerance | ±0.1 | ±0.1 | ±0.1 | ±0.1 | ±0.15 | ±0.15 | ±0.15 | ±0.15 | ±0.2 | |||||||||
| Q dimensions | 1.01-0.65 | 1.21-0.85 | 1.32-0.95 | 1.42-1.05 | 1.72-1.34 | 1.83-1.30 | 2.13-1.60 | 2.83-2.29 | 2.86-2.31 | |||||||||
Bind head
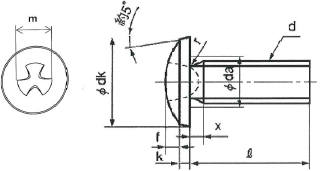
| Nominal diameter | M2 | M2.3 | M2.5 | M2.6 | M3 | M3.5 | M4 | M5 | M6 | |||||||||
| Clover ( m dimension) | (1.9) | (1.9) | (2.3) | (2.3) | (3.5) | (3.8) | (4.1) | (4.5) | (5.0) | |||||||||
| Head diameter Φ(dk) | 3.5 | 4.0 | 4.5 | 4.5 | 5.5 | 6.0 | 7.0 | 9.0 | 10.5 | |||||||||
| Head Tolerance |
+0 -0.4 |
+0 -0.4 |
+0 -0.4 |
+0 -0.4 |
+0 -0.5 |
+0 -0.5 |
+0 -0.5 |
+0 -0.5 |
+0 -0.7 |
|||||||||
| Head Thickness(K) | 1.3 | 1.5 | 1.7 | 1.7 | 2.0 | 2.3 | 2.6 | 3.3 | 3.9 | |||||||||
| Height tolerance | ±0.1 | ±0.1 | ±0.1 | ±0.1 | ±0.15 | ±0.15 | ±0.15 | ±0.15 | ±0.2 | |||||||||
| Q dimensions | 1.40-1.10 | 1.40-1.10 | 1.70-1.30 | 1.70-1.30 | 1.80-1.40 | 2.1-1.70 | 2.50-2.00 | 2.73-2.14 | 2.86-2.26 | |||||||||
Flat head
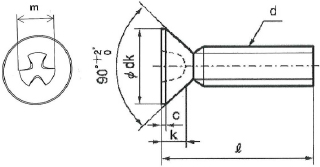
| Nominal diameter(M) | M2 | M2.3 | M2.5 | M2.6 | M3 | M3.5 | M4 | M5 | M6 | |||||||||
| Clover ( m dimension) | (2.2) | (2.3) | (2.3) | (2.3) | (3.5) | (3.8) | (4.1) | (4.5) | (5.0) | |||||||||
| Head diameterΦ(dk) | 4.0 | 4.6 | 5.0 | 5.2 | 6.0 | 7.0 | 8.0 | 10.0 | 12.0 | |||||||||
| Head tolerance |
+0 -0.4 |
+0 -0.4 |
+0 -0.4 |
+0 -0.4 |
+0 -0.5 |
+0 -0.5 |
+0 -0.5 |
+0 -0.6 |
+0 -0.7 |
|||||||||
| Head Thickness(K) | 1.2 | 1.35 | 1.45 | 1.5 | 1.8 | 2.0 | 2.3 | 2.8 | 3.4 | |||||||||
| Height tolerance |
+0 -0.2 |
+0 -0.2 |
+0 -0.2 |
+0 -0.2 |
+0 -0.3 |
+0 -0.3 |
+0 -0.3 |
+0 -0.3 |
+0 -0.4 |
|||||||||
| Q寸法 | 1.40-1.10 | 1.40-1.10 | 1.50-1.20 | 1.50-1.20 | 1.80-1.40 | 2.1-1.70 | 2.50-2.00 | 2.73-2.14 | 2.86-2.26 | |||||||||
BIT for HIOS Clover screw
M4.0〈#0〉~4.0
Specification Table
M4.0〈#0〉~4.0
Specification Table
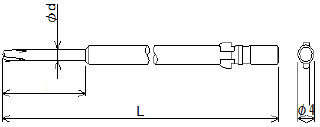
H4
|
Bit Drive |
Specifications | Length | |||
| Clover hole number | Shaft dia(d) | Length of Tip(l) | |||
|
H4 For HIOS Screwdriver |
1.4~2.0 | 1.5 | 20 | 40, 60 | |
| 1.7 | 20 | 40, 60, 80 | |||
| 2 | 20 | 40, 60, 80 | |||
| 2.6 (2.5) | 2.5 | 20 | 60, 80, 100 | ||
| 3 | 3.6 | 20 | 60, 80, 100 | ||
H5

|
Bit Drive |
Specifications | Length | ||
| Clover hole number | Shaft dia(d) | Length of Tip(l) | ||
|
H5 For HIOS Screwdriver |
3 | 3.6 | 20 | 60 |
5HEX

|
Bit Drive |
Specifications | Length | ||
| Clover hole number | Shaft dia(d) | Length of Tip(l) | ||
|
5HEX (WAF:5㎜) |
3 | 3.6 | 20 | 75 |
| 4 | 4.1 | 20 | 100 | |
1/4HEX

|
Bit Drive |
Specifications | Length | ||
| Clover hole number | Shaft dia(d) | Length of Tip(l) | ||
|
1/4HEX (WAF:6.35㎜) |
4 | 4.5 | 20 | 75, 100 |
Order Instructions
Example) If you order a clover bit with Shank shape: HIOS shank φ4mm, Clover hole number: M2.0 and total length: 60mm, the part number will be THS4-Y20-60.
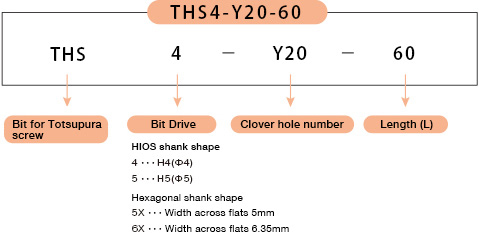
- ※Please contact us for the stock status at each time.
- ※It is possible to manufacture a product whose specifications are not described above.
- ※In the case of a Totsupura screw with a thin head portion, the Totsupura cross hole number sometimes might be smaller than the one you usually use, so please contact us for the part number when you order the bit.
- ※It is possible to manufacture other Shank shapes, such as D-cut (half-moon) type, automatic machine type and screw biting prevention type other than H4, H5, 5HEX, 1/4HEX described above.
- ※In our company we ask two cooperation companies to perform the production, and separete between them by whether or not putting K after the L dimension present at the last of the part number code. For example, A Company: THS4-Y20-60, B Company: THS4-Y20-60K.
The cross portion and Shank portion sizes, hardness, etc. of the products of both companies are the same, because the processing method for removing the scale (black strong film generated on the surface at the time of steel thermal treatment) is different, the color and luster might be different. When there is no specification from the customer, in particular, please be aware that we will judge to ship which one of two product types depending on the stock status.

